The following procedure outlines steps to troubleshoot the AXM-NET module in the case when it is not communicating.
First confirm that the meter has the proper settings configured for the AXM-NET module.
To confirm these settings go to the System Settings of the meter:
- Make sure you are in the ‘Setting’ mode. To get to this screen, press ‘H’ and ‘V/A’ simultaneously; the display selection mode will be activated and the screen should become blank. With the cursor flashing, press ‘P’ or ‘E’ to move the cursor to ‘Setting’. Press ‘V/A’ to enter the ‘Setting’ mode.
- You will be required to type in a password in the ‘PASSWORD’ screen. Leave the password as default ‘0000’ and press ‘V/A’ to enter the parameter selection mode.

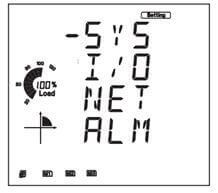
Figure 1: Parameter Selection Mode
- This will take you to the parameter selection mode, with ‘SYS’, ‘I/O’, ‘NET’ and ‘ALM’ as options. The cursor will be on ‘SYS’. Press ‘V/A’ on this screen to get to the system settings.
- The first screen you will see is ‘S01 ADDR’.
- Press ‘P’ to get to the ‘S03 BPS2’ screen. This is the baud rate for the NET module; make sure it is set to ‘38400’. Otherwise to change this:
- Press ‘V/A’ to modify; the number will begin to flash.
- Press ‘P’ or ‘E’ to change the number.
- Press ‘V/A’ to confirm the change; the number should stop flashing
- Now keep pressing the ‘E’ button until you get to the ‘S31 PAR2’ screen. This should be set to ‘1NO’, if not
- Press ‘V/A’ to modify; this setting will begin to flash.
- Press ‘P’ or ‘E’ to change it.
- Press ‘V/A’ to confirm the change; the flashing should stop.
- Lastly, press ‘P’ till you get to ‘S34 PROTOCOL2’, this should be set to ‘OTHER’, if not
- Press ‘V/A’ to modify; this setting will begin to flash.
- Press ‘P’ or ‘E’ to change it.
- Press ‘V/A’ to confirm the change; the flashing should stop.
After verifying these settings, the next step is to verify the NET Settings and to reboot the NET module.
To confirm these settings go to the NET Settings of the meter:
- Press the ‘H’ button to get back to the parameter selection mode, with ‘SYS’, ‘I/O’, ‘NET’ and ‘ALM’ as options. Move the cursor to ‘NET’ by pressing ‘P’ twice. Once the cursor is on ‘NET’ press the ‘V/A’ button to enter the NET Settings.
- Press ‘P’ to get to ‘N02’ IP address screen. Verify that it is the correct IP Address. If you would like to change it:
- Press ‘V/A’ to modify; the first digit will begin to flash.
- Press ‘P’ or ‘E’ to change the number of the flashing digit
- Press ‘H’ to switch the flashing digit
- Press ‘V/A’ to confirm the change; the digit should stop flashing
- Press ‘P’ to get to ‘N03’ SUBMASK screen. Verify that it is correct or change it using the same procedure in step b above.
- Press ‘P’ to get to ‘N04’ GATEWAY screen. Verify that it is correct or change it using the same procedure in step b above.
- Press ‘P’ to get to ‘N05’ DNS1 screen. Verify that it is correct down or change it using the same procedure in step b above.
- Press ‘P’ to get to ‘N06’ DNS2 screen. Verify that it is correct or change it using the same procedure in step b above.
- Press ‘P’ to get to ‘N07’ Modbus PORT screen. Verify that it is correct or change it using the same procedure in step b above.
- Press ‘P’ to get to ‘N08’ HTTP PORT screen. Verify that it is or change it using the same procedure in step b above.
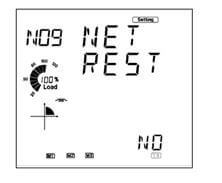
- Press ‘P’ to get to ‘N09’ NET RESET screen. You will need to RESET the module after making any changes in this section. This will load the changes onto the module. To do this:
- Press ‘V/A’ to modify; ‘NO’ should begin to flash
- Press ‘P’ to change ‘NO’ to ‘RESET’.
- Press ‘V/A’ to reset the module. ‘NO’ will be displayed on the screen and the NET module settings should now be changed.

Figure 2: NET Reset Option
After verifying these settings, go back to the Metering Mode of the meter.
To do this:
- Press the ‘H’ and ‘V/A’ buttons simultaneously; the display selection mode will be activated and the screen should become blank. With the cursor flashing, press ‘P’ or ‘E’ to move the cursor to ‘Meter’. Press ‘V/A’ to enter the Metering mode.
- Observe if the following icon is present on the bottom of the display:

- If it is then the AXM-NET module is properly configured and communicating.
If after trying all the steps above and the AXM-NET module is not communicating, contact Technical Support at Accuenergy for further assistance.
 X
X 
 X
X  X
X  X
X